Last weekend the
Bulletproofbodies Team had the pleasure of studying with a true pioneer in Physiotherapy, Professor Dr
Jeremy Lewis.
Jeremy is a Physio that specializes in the Shoulder and has published extensively in the literature, he
is also the Editor of Grieve’s Modern Musculoskeletal Physiotherapy.
The Bio-Psycho-Social
approach has long been used in Physiotherapy and it is the exact opposite of
the Bio-medical model.
The bio-medical model
is the belief that the pain is coming from noxious “issues in the tissues.”
The Biopsychosocial
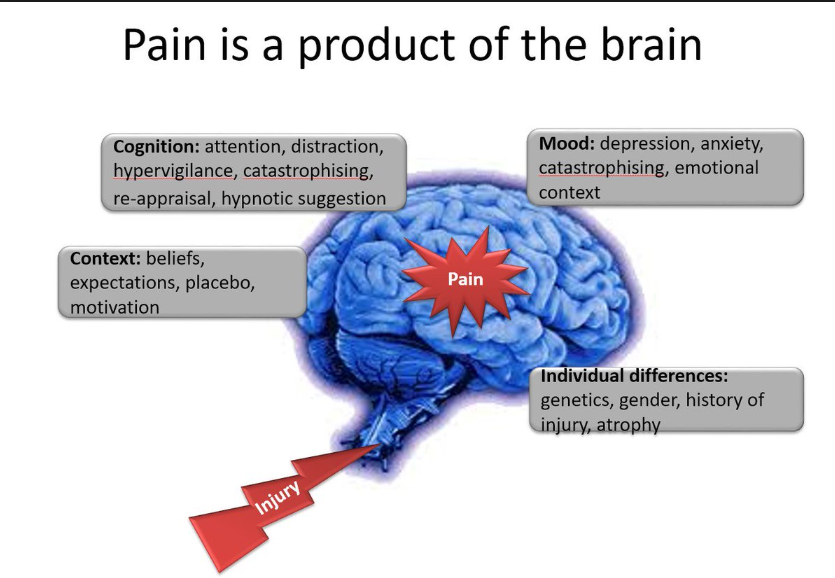
approach is different and is influenced by the NEW Pain Science, where we now
know that “Pain is in the brain.”
Jeremy has simplified shoulder issues into the following:
The diagnosis of a
painful shoulder has been divided into 4 inter-related categories:
Not a Shoulder
Weak and Painful
Stiff and Painful
Unstable "Wobbly"
With 4 pre-disposing factors:
Psychosocial
Biomechanics
Lifestyle
Kinetic Chain
The evidence for Exercises
prescribed by a Physiotherapist are as good as Surgery for the shoulder.
Physio is not "second best" treatment, but should be first line treatment, before surgery is considered (in a number of non-trauma cases).
This means that Physio can significantly reduce the number of surgeries on an already over-burdened NHS service.
The group of muscles
collectively know as the rotator cuff are vital to shoulder function. Problems
with any of these muscles can cause pain and dysfunction in the shoulder. But
what exactly is the "rotator cuff" and what does it do? More
importantly, what is the best way to keep it strong and pain-free? These are
the questions that this article will address.
Rotator Cuff Anatomy
Let's briefly review
the anatomy of the four rotator cuff muscles:
Supraspinatus. This
muscle originates from the top of the shoulder blade and inserts into the back of
the shoulder bone. It is classified as an abductor of the shoulder, that means
it helps raise your arm to the side.
Infraspinatus. This
muscle originates from the back of your shoulder blade to the back of your
shoulder bone. It is the second largest rotator cuff muscle and is classified
as an external rotator of the shoulder.
Teres Minor. This
muscle originates from the back of the shoulder blade and inserts on the back
of the shoulder bone. It is classified as an external rotator of the shoulder.
Subscapularis. This
muscle originates from the front of the shoulder blade and inserts on the front
of the shoulder bone. It is the largest rotator cuff muscle and is classified
as an internal rotator of the shoulder.
An easy way to remember
the name of the muscles is the acronym SITS:
Supraspinatus,
Infraspinatus, Teres minor, and Subscapularis.
True Function of the
Rotator Cuff
Although these muscles
are classified as external rotators, an internal rotators, and an abductor,
this is only true from a purely kinesiological perspective. In other words,
this is how the muscles work in isolation but not in functional movements such as
throwing a baseball or reaching for an object off a high shelf.
The functional role of
the cuff is to provide dynamic stability to the shoulder during movement. This
is accomplished by all four muscles pulling the head of the humerus into the
shoulder socket whenever you move your arm. Shoulder impingement and rotator
cuff tears can result if theses muscles aren't working properly or if you have
bad mechanics at the shoulder joint.
Shoulder Impingement
and Rotator Cuff Tears
I've got some
interesting news for you: you may have or be on your way to having shoulder
problems and not even know it. In a study by Sher et al., MRIs were taken of 96
asymptomatic (without pain) adults and it was found that 34% of them had
rotator cuff tears with 54% of them found in adults over 60 (participant's ages
were from 19 to over 60 years old).
There are most likely
many reasons for this. One important reason is there is a part of the cuff that
has no blood supply. Research shows that this area gets larger as we get older
and is a normal part of aging. However, this makes injury more likely and
decreases your chances for healing.
This means that if you
start having rotator cuff symptoms, you might be on your way to tearing your
cuff. Problems with the cuff problems are usually progressive. The progression
is as follows:
Irritation-->Inflammation-->Fraying-->Tearing
Here's the solution:
start using rotator cuff exercises in your program. Getting stronger and
building endurance is the key here. The stronger you are, the less strength you
are using during any activity.
Rotator Cuff Exercises
So you know you should
be training your cuff muscles whether you're injured or not, but what is the
best exercises to start with? Research on 7 different exercises determined that
side-lying external rotations was the most effective exercise and external
rotations at 90 degrees of shoulder abduction was the second most effective
exercise. I recommend that you start with side-lying external rotations. You
can eventually progress to external rotations at 90 degrees this exercise is
technically more difficult and may cause problems with shoulders with poor
mechanics.
--To perform side-lying
external rotations, lay on your side with good alignment of your spine. Keep
your arm at your side with your elbow bent to 90 degrees while holding a
dumbbell. Slowly rotate your away from your body then slowly lower it back to
the starting position.
Here's what I recommend
for a beginning strengthening program:
1-2 sets of 10-15
repetitions before upper body exercise.
1-2 sets of 10-15
repetitions 4 times per week.
Keep in mind that if
you use too much weight, you're not working the right muscles and if you
overwork your rotator cuff, you cause these muscles to get too tired and they
can't do their job!
Ted Ryce is a Miami
Beach Personal Trainer who specializes in corrective exercise and post
rehabilitation.
Visit my website for
more information on Exercises for Injuries and Personal Training In Miami
Beach.
We all know people who
were really into bodybuilding at one time in their lives but eventually dropped
out after a few years of hardcore lifting. Why? In many cases, these guys
developed so many nagging injuries they eventually just gave up on training. Injuries
to the shoulders top the list. It doesn't have to be that way, of course.
Proper care and feeding of your "caps" can keep them healthy through
years of hard training. After all, you can't build cannonball delts if you're
injured.
Here are a few exercises
to get your shoulders stronger, healthier, and yes, maybe even a little bigger.
Cuban Rotation
Don't let the name fool
you. I'm not talking about the fine art of cigar making or some weird form of
torture. Okay, perhaps the latter does apply. (You'll know what I mean when you
try it.) This movement stems from the Cuban press, an exercise popularized by
Charles Poliquin when Muscle Media was actually Y2K compliant. If you want to
seriously drive your bench press or pull-up poundages through the roof, then
you've come to the right place. If, on the other hand, you're merely seeking to
improve your shoulder health and add some strength in the meantime, then you're
also in luck!
The limiting factor in
the original three-part Cuban press (which is basically an upright row,
external rotation, and an overhead press) is the rotation, thus the name
"Cuban rotation." It's all about balance. By working the weak link,
the entire chain gets stronger. The beauty is that not only will your Cuban
press get stronger, but so will other lifts like the bench press and pull-up.
By using a barbell, this movement is very specific to the aforementioned
exercises. The Cuban rotation can be performed standing, seated, or kneeling,
but to respect the Law of Specificity, you should use the same grip you
commonly use for your benches and wide grip pull-ups.
With the arms abducted
(raised out to the side), the Cuban rotation primarily stresses the
infraspinatus, a rotator cuff muscle responsible for external/lateral rotation
of the humerus (your upper arm bone). Unless you've been hiding under a rock
over the last decade, you should know that the big boys up top, i.e. your pecs
and lats, are internal rotators of the humerus. It's very easy to develop a
muscular imbalance since most programs heavily favor internal rotation and not
external rotation.
The integrity of the
shoulder joint subsequently suffers, increasing the likelihood of injury.
Furthermore, strength about the shoulder joint is also compromised as a
protective measure if the external rotators aren't well developed and can't
stabilize a heavy load.
Okay, here we go. To
perform the Cuban rotation, start with your upper arms raised out to your sides
until they're parallel to the ground and in line with your shoulders. The bar
should be positioned directly in front of your lower sternum. Keep your elbows
bent at 90 degrees and the wrists straight and firm throughout. Rotate the bar
toward your forehead but stop just shy of vertical at the top of the movement.
This will ensure that you maintain tension on the muscle at all times.
If you hit yourself in
the head, then you either went too far (duh!), and/or your elbows were too low
(below shoulder level). Keep your chest up and head erect during the entire
exercise. As a matter of fact, imitate your favorite Playmate and draw your
sternum up as high as possible. According to some experts you're about 10%
stronger in this position, although this is a bit of a generalization. On the
eccentric (negative) contraction, rotate the bar down as far as you can without
lowering your chest or your upper arms.
Don't get too brave
with this exercise; take it easy on the weight to begin with and concentrate on
your form. A standard 45-pound Olympic bar will be too heavy for most of you
and a 15 pound cambered (EZ-Curl) bar will probably be light, so find a weight
in between. Don't be deceived, though. This exercise is a lot like the movie
Man On The Moon; you start off laughing but end up crying. The Cuban rotation
will catch up to you quickly and you'll definitely feel it!
Also, don't go
overboard (i.e. Titanic) with the sets, especially at the beginning. Since the
external rotators are relatively small muscles, two to three sets of 12 to 15
reps will do just fine to begin with. It's advisable to use light weights and
higher reps at this stage to develop the neural pathways. However, research
indicates a slightly greater proportion of fast twitch muscle fibers in the
infraspinatus; therefore, a medium rep range would be ideal.
Your second go around
with this exercise, during a different program, should then concentrate on a
slightly lower rep bracket (8 to10 reps) for three to four sets. Use a moderate
tempo and take two seconds to complete the positive contraction and two to four
seconds for the negative (lowering) with no pause in between. Use short rest
intervals: 45 to 60 seconds at the lower intensity/load and 75 to 90 seconds at
the higher intensity.
In general, to improve
the strength and integrity of the shoulder joint, you should perform external
rotations on a regular basis. With that in mind, check out this next exercise
that's also quite effective, but will hit you from a totally different angle.
The Super Set
A1) Side-Lying Dumbbell
External Rotation
To all you competitive
bodybuilders and European females, accidentally spilling Nair on your nipples
is nothing compared to this combination of exercises. Take it from me, this
superset will burn like crazy!
The side-lying dumbbell
external rotation works the teres minor, the other rotator cuff muscle
responsible for, you guessed it, external rotation. This is an exercise
commonly prescribed by many therapists to rehabilitate an injured shoulder, but
it also serves as an excellent strength and conditioning movement if performed
correctly. In fact, Ian King thinks of it as one of the most valuable external
rotation drills.
Start by lying on your
side with your knees bent slightly for comfort and support. Grab onto a light
dumbbell and keep your upper arm bent at 90 degrees throughout the exercise.
(Of course, when performing unilateral movements, always start with your weak
side first.) Rest your head on your lower arm, not your hand, to keep the
cervical spine neutral. This point may seem trivial, but is actually very important
and will make a difference in strength.
Keeping the wrist of
your working arm straight and firm, rotate the dumbbell backward as far as you
can but never go beyond perpendicular to the floor. Then, in a smooth fashion,
lower the weight without it ever touching the ground. Try to keep your elbow
glued to your side and minimize the amount of flaring for best results.
If you think that
taking an ice cold bath is a humbling experience, try to impress a chick with
this exercise. You won't! I've even had some men start with a semi-filled water
bottle on this one! (I didn't have the heart to hand them a soup can.) On
average, though, most men use between five to ten pounds. Again, keep the reps
fairly high in the 12 to15 range.
With external rotations
in particular, it's wise to use small loading progressions. The five pound jump
typical on most dumbbell racks may be too much. You'll be quite surprised what
a difference only five pounds makes in this exercise! If you have access to
PlateMates then you can take advantage of microloading for continued strength
gains.
The other option is to
manipulate the tempo. By slowing down the speed of execution, you can
effectively make this exercise more difficult. Moreover, by altering trunk
position, you can influence the strength curve and control the level of
difficulty You can do this by rotating your trunk forward to make the exercise
more difficult; rotate back and it's a breeze. This is a trick I learned from
Jerry Telle and his concept of Tellekinetics.
Take no rest and
proceed to the next exercise.
A2) Side-Lying Dumbbell
Rear Delt Raise
Since most upper-body
exercises favor the anterior head of the deltoid (or for those that read Men's
Fitness, the front part of the shoulder), a muscle imbalance is not uncommon.
This exercise, on the other hand, stresses the posterior (rear) deltoid and may
help to improve a kyphotic (hunchback) posture and rounded shoulders that's so
common in today's society.
With the dumbbell still
in hand, extend your arm out directly in front of your chest. Your upper arm
will actually make contact with your chest and the elbow should be slightly
bent. This is the starting position. Now, move the dumbbell in an arcing motion
until it's almost directly above your shoulder. In order to maintain tension on
the working muscle, you don't quite want to reach vertical at the top position.
It's important that you follow the same pathway and remain in the same plane of
motion (a.k.a. the Technical Limit Principle) on each repetition to derive the
best results from this, or any other, exercise.
Perform the same number
of reps as the external rotation and repeat the superset two to three times
with no more than two minutes rest in between. Variations for this exercise
include lying on a Swiss ball or on a bench and adjusting the angle of incline.
Conclusion
I won't be Milli
Vanilli and tell a lie. This routine isn't going to build huge delts, but it
will keep you lifting for a long time to come. You may even discover some new
found muscularity filling the gaps behind those deltoids. After a few weeks,
I'm sure you'll appreciate the improved shoulder strength. After a few years,
you'll really appreciate the pain-free and healthy shoulders.
John Paul Catanzaro,
B.Sc., C.K., C.E.P., is a Certified Kinesiologist and Certified Exercise
Physiologist with a Specialized Honours Bachelor of Science degree in
Kinesiology and Health Science. He owns and operates a private gym in Richmond
Hill, Ontario providing training and nutritional consulting services. For
additional information, visit his website at http://www.CatanzaroGroup.com or
call 905-780-9908.
Note: John Paul has
just released his new book The Elite Trainer: Strength Training for the Serious
Professional. The book features 55 programs, dozens of training methods and
cutting-edge techniques, and over 100 exercise illustrations. Pick up your copy
today at http://www.TheEliteTrainer.com.
The Ball & Socket
joint of the shoulder is called the Gleno-humeral joint.
When you lift your arm,
the rotator cuff tendon passes through a narrow space at the top of your
shoulder, known as the subacromial space.
Shoulder impingement
occurs when the tendon rubs or catches on the bone at the top of this space,
called the acromion.
You are likely to get
away with CrossFit in your twenties, but shoulder impingement is more likely to
develop in the over thirties.
What are the Symptoms
of Shoulder Impingement?
Commonly rotator cuff
impingement has the following symptoms:
·An arc of shoulder pain approximately
when your arm is at shoulder height and/or when your arm is overhead.
·Shoulder pain that can extend from
the top of the shoulder to the elbow.
·Pain when lying on the sore shoulder.
·Shoulder pain at rest as your
condition deteriorates.
·Muscle weakness or pain when
attempting to reach or lift.
·Pain when putting your hand behind
your back or head.
·Pain reaching for the seat-belt.
This can happen if:
the tendon becomes
swollen, thickened or torn – this can be due to an injury, overuse of the
shoulder (for example, from sports such as swimming or tennis) or "wear
and tear" with age.
the fluid-filled sac
(bursa) found between the tendon and acromion becomes irritated and inflamed
(bursitis) – this can also be caused by an injury or overuse of the shoulder.
the acromion is curved
or hooked, rather than flat – this tends to be something you're born with there
are bony growths (spurs) on the acromion – these can develop as you get older
It is repeated movement
of your arm into the impingement zone overhead that most frequently causes the
rotator cuff to contact the outer end of the shoulder blade (acromion). When
this repeatedly occurs, the swollen rotator cuff is trapped and pinched under
the acromion.
Injuries vary from mild
tendon inflammation (tendonitis), bursitis (inflammed bursa), calcific
tendonitis (bone forming within the tendon) through to partial and full
thickness rotator cuff tendon tears, which may require surgery.
The shoulders rotator
cuff tendons are protected from simple knocks and bumps by bones (mainly the
acromion) and ligaments that form a protective arch over the top of your
shoulder. In between the rotator cuff tendons and the bony arch is the
subacromial bursa (a lubricating sack), which helps to protect the tendons from
touching the bone and provide a smooth surface for the tendons to glide over.
Impingement Syndrome in
itself is not a diagnosis, it is a clinical sign.
There are at least six different diagnoses which can cause impingement syndrome which include:
1. bone
spurs
2. rotator cuff injury
3. labral injury
4. shoulder instability
5. biceps
tendinopathy
6. scapula dysfunction.
If left untreated, shoulder impingement
can develop into a rotator cuff tear.
Researchers have concluded that there are essentially 7 stages that need to be covered to effectively rehabilitate these injuries and prevent recurrence.
These are:
1. Early Injury: Protection, Pain Relief
& Anti-inflammatory Treatment
2. Regain Full Shoulder Range of Motion
3. Restore Scapular Control and
Scapulohumeral Rhythm
4. Restore Normal
Neck-Scapulo-Thoracic-Shoulder Function
5. Restore Rotator Cuff Strength
6. Restore High Speed, Power,
Proprioception and Agility Exercises
7. Return to CrossFit, Sport or Work
This week we will focus on Shoulder injuries and Rotator Cuff related shoulder pain.