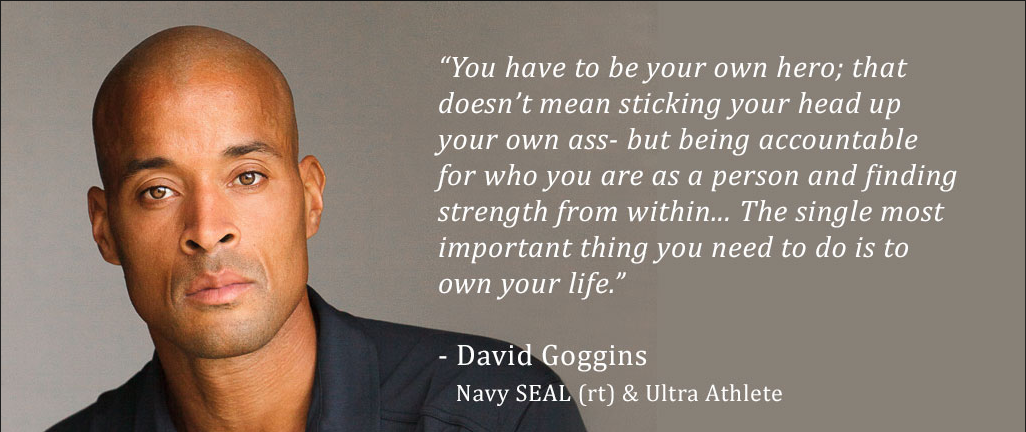
Last week Bulletproofbodies had the
absolute pleasure of meeting the legend that is David Goggins.
The interviewer started
with:
“How do we all be more like David Goggins?”
David was immediate in
his response.
“Don’t become like me,
be your own Hero!”
David wants us to use this example to achieve more.
He was "built not born" and he states that this ability to endure is within all of us.
David’s book “Can’t
Hurt Me” is amazing, but even better is the Audio book/Podcast.
David and Adam do a spectacular job in this experimental Audio Book that is read by Adam and then elaborated by both Adam and David after each chapter.
There is a challenge
for the reader after every chapter so that you can implement the lessons for yourself and then use the hashtags on social media.
#canthurtme
What makes David
Goggins different from all the rest is his vulnerability.
It is easy to sing
when you are winning, but what if you had David’s upbringing?
This bad-ass MF tells
you what happens to him in a brutally honest and refreshingly authentic way
that could not be less Hollywood if he tried.
David’s Rules:
1.Callus your mind
2.The Accountability Mirror
3.The 40% rule
4.Remove the Governor that limits you
David Goggins is living
proof that more can be achieved through hard work and effort than any of us
ever think possible.
From Navy Seal to Ultra Endurance Athlete. He is the real deal and also one of the most inspirational people the Bulletproofbodies Team have ever met.
This week the legend that is Paul Chek released a Podcast with Bulletproofbodies co-founder Dale Walker on Living 4D with Paul Chek:
https://chekinstitute.com/podcast/
Paul and Dale got into all sorts of topics from Eugene Sandow to Therapists performing rectal trigger points, from Women in the Infantry to CrossFit.
Dale met Paul back in 2001 at Fit Pro in the UK when the Chek Institute had the old logo:
No-one at that conference was talking on his level.
In 2019, no-one is still talking on his level.
Dale is a student at the CHEK Institute in the UK.
Dale has integrated Paul's Primal Patterns into teaching Exercise Prescription at the University of Salford in the UK.
Dale also work with CrossFit athletes from all different levels including the boy wonder Reece Mitchell (watch out for him at the CrossFit Games 2019).
Don't forget to download a FREE copy of Don't get Cross get Fit:
The Festival season is upon us and
the Bulletproofbodies team have just got back from Download Festival.
It got us thinking that Festivals can
by dangerous places, particularly if you are going in the mosh pit!
But just standing around and watching
bands can give you back pain, leg pain, calf problems, knee pain and neck pain,
all these can be due to a number of different factors, from sleeping positions
to lifting heavy people who want to crowd surf.
The good news is that there are ways
you can improve your chances of having an injury and pain free Festival.
1. Prepare to move or Mosh!
If you have a desk based job or live
a sedentary lifestyle, being at a festival for four days can be a sudden, huge
increase in activity and shock for your body. Out of interest I checked the
health app on my phone after Download this year and I totalled around 90k or
56 miles by the end of the weekend. You wouldn’t go on a three day 56 mile hike
without any training, preparation or proper footwear, so it’s crazy when you
think that we just turn up in wellies and shorts and do that for a full
weekend. I’m not suggesting that you start training for a festival, but
obviously being as active, strong and healthy as you can beforehand is going to
work in your favour.You also need to be realistic and prepare if you have an
injury or pre-existing condition.
2. Wear sensible footwear
Wellies are heavy and clumpy, which
can cause you to move around differently and affect the biomechanics of how
your body functions as a whole.Hiking boots (if it’s wet) or a good pair of
trainers (if it’s sunny) are better options as they’re much more supportive and
are going to help to take the impact of all that walking. Obviously, if it’s
torrential downpour then you may want to switch between wellies and hiking boots
to give them a chance to dry off.
3. Invest in sleeping equipment
It’s not always easy to sleep at
festivals, but sleep gives your muscles a much needed chance to relax whilst
your body works to repair and heal itself.
If you’re on a really hard surface, you’re
going to be waking up throughout the night and moving into uncomfortable
positions.Invest in making your sleeping area more comfortable if you can. This
could be something like a decent inflatable roll-matt or a more expensive
option like an airbed.
4. Stay hydrated
Drink some water with your alcohol! If you become dehydrated your body’s
tissues are more susceptible to injury. Make sure that you drink enough WATER throughout the festival and especially if you are in the sun all day and
drinking alcohol.
5. Find the Massage Tent ASAP
Many festivals offer massage. If you can find the time or wake up
early enough, then taking part in these can be a great way to rest and
recuperate after a night of partying.
6. Lift carefully
Transporting heavy
equipment, carrying a rucksack and even lifting others onto your shoulders can
easily leave you injured or in discomfort.Be mindful of how you are lifting and
carrying things, and don’t overload yourself.Think about how you’re going to
shift your equipment to and from your car and campsite. If it feels like too
much, then two trips are going to be better than one. Trollies can also be
helpful.
7. Prepare if you have an existing
issue or injury
If you’re recovering from an old
injury or know that you have a pre-existing issue, for example a weakness in
your ankle, then think about how you are going to manage this beforehand.If you
see a physiotherapist in advance they will be able to offer you advice about
building strength in the area where you will need it and how to manage your
issue once there.It can also help to plan for a flare-up, for example by
packing compression bandages and pain medication with the advice of your doctor
or pharmacist.
8. Stretch to relieve tension
These are great stretches that can
help to relieve common areas of tension either while you are at the festival or
once you get home.
9. Rest after the festival
Once you
get home make time to rest and get a good night’s sleep.Putting your feet up
can help to relieve tension in your legs and feet.Many people also use ice and
heat to relieve aches and pains, for example in the neck and back.
10. Plan for disaster
Drunk people tend to fall over and tents don’t offer a lot of support so when the 2 meet poles tend to get broken so take some Gaffa tape with you to try and patch up any broken poles.
11. Enjoy yourself
Lets remember your there to enjoy yourself so do just that, drink lots, meet new friends and party like a Rock Star.
12. Don’t ignore an injury or pain
that doesn’t subside.
All festivals will have paramedics on
hand and a medical tent.
If you are concerned that you have sustained an injury
or if you are struggling to move, you should rest the area and seek help from
them.The majority of what we call acute soft-tissue injuries, which includes
sprains and strains, will feel better within a few days and recover within 4
weeks with the right care and rest.
If it has been more than a week since the
festival and you are still experiencing pain or the problem isn’t getting
better, then see a Physiotherapist. They will be able to identify the underlying
cause, accelerate your recovery and provide you with relief from pain by using
manual therapies such as soft-tissue massage. Download Festival, the Bulletproofbodies Team Salute you.
Well, it is a
combination exercise using Dumb bells
Of a Down-Up Movement
followed by a Dumb Bell Swing
The Bulletproofbodies team have already been treating athletes who have either under-estimated this movement, by going too heavy or are not familiar with the rhythm of the movement change.
Don't get caught out.
Instead
Bulletproof Your Technique
How to perform the
devils press:
Let the dumbbells hang next to the
body
Hip hinge
Lower the weights to the ground
(preferably in-line with shoulders)
Lower the body to the ground
Perform a semi-explosive triceps
push-up
Follow through and kick the legs in
(underneath)
(This is technically a down-up with Dumb Bells)
Contract the gluteus maximus for a
static hip hinge
Mid-line stable
Pull the dumbbells all the way to the
back between the legs
Contract the gluteus maximus and
hamstrings to pull the pelvis up with a rigid spine
There are two versions to get the Dumb bells over head:
Follow through while swing snatching
the dumbbells overhead (most popular version) or
Clean and rack (correct version)
Press
Stand up straight and achieve a
proper overhead lockout
Lower dumbbells to hanging next to
the body
Repeat
Make sure that your chest touches the ground and the Dumbbells are visible behind the legs
upon back swing.
The area to concentrate on your form is the transition from upwards movement into the swing with a straight back.
This is a unique transitionmovement and it would be worth practicing the "Boot-Strapper Squat" as your warm up (this was covered in a previous blog).
The
Bulletproofbodies Team have just started using Rock Pods.
So, what
exactly are they?
This unique
set of eight silicone pods (4 large, 4 small) allow you to grab, pull and push
fascia to treat pain, mobility and movement dysfunctions.
Made from
medical-grade silicone and packaged in a convenient carrying case, every
RockPod set includes a quick-start guide.
What are
Rock pods?
Rock Pods
are a version of cupping. They are
medical grade silicone cups that come in 2 sizes. Each set of Pods has 4 large an 4 small cups
and come in a convenient carry case.
What are
they designed to do?
Cupping
creates a decompressive force in the tissues immediately under the cup (with a
compressive force created around the rim of the cup). This lifting of the tissues can be a
different stimulus to the tissues and the nervous system and for some people
can be a relaxing way of treating tight or sore areas. The decompressive effect is greater than that
generated by RockTape but the two modalities are essentially treating the same
way. It is the opposite of many other
forms of manual therapy that typically create a compressive force such as
massage, use of massage tools, floss bands and compression bandages.
What’s the
different between these and the glass ones?
Traditionally,
cupping was done with glass cups. These
are heated over a flame and then quickly applied to the body part to create the
suction effect. More recently, cupping
sets have become plastic cups with a one-way valve at the top of the cup, with
a hand operated vacuum pump generating the suction pressure. The reliance on the vacuum pump can be
problematic in a clinic with multiple treatment rooms when trying to locate the
pump! The Rock Pods utilise an
“in-built” suction system- you can use the plunger on the top of the Pod to
press down and generate a moderate level of suction, or the cup can be inverted
on itself, placed over the target tissue and the edges of the cup “rolled” into
contact with the skin- this creates a significantly higher level of
suction. These two levels of suction
allow the user to progress from a lighter suction force to a greater suction
force if necessitated, but allows a lighter level of suction to be tried first. This is in keeping with our philosophy “less
is more”- start with “less”, and only progress to “more” if required.
The
silicone pods are also easier to travel with as they are not breakable,
eliminate the need to carry the vacuum pump and come with a much more compact
carrying case.
Do they
slide or move after applying?
These cups
do not slide well on the skin once they are applied. However they are excellent at maintaining
suction pressure whilst the client moves with the Pods in place.
How long do
you keep them on for?
Typically
most Pods will be in place for only a few minutes at a time. The lower body areas (low back and legs) are
typically able to withstand longer application times, whereas the upper body
(trunk, neck and arms) may get an adequate treatment effect with shorter
applications.
Will they
leave a bruise?
Occasionally a small circular bruise will be left where the Pod has
been. This occurs less in lower body
regions and less often with the lighter suction pressure (plunger method). Bruising is not typically an aim of
treatment, but may occur more readily in people who bruise easily. With this in mind we recommend shorter
application times initially for these people to test their tolerance
to treatment with the Pods. Applying the
Pods to the face/head region is much more likely to cause a bruise and is not
generally recommended.
Will they
stick to body hair?
The Pods
generally stick well over body hair, but if the body part has very thick,
coarse hair, then a small amount of Rock Rub will usually help create the
desired level of suction.
How do they work?
There are 4 potential mechanisms for Cupping with Rock Pods:
Mechanical changes, Chemical responses, Neurological changes and Fluid dynamics.
We have also been using Rock Pods for adverse Neural Tension with some interesting effects.
The final part of this Blog series is about the end of the jump, the landing.
The Landing is the most
important part of any jumping activity in terms of injury prevention.
Landing skills can be
practiced in a short amount of time and will bring many long-term benefits.
The ideal jump landing
allows an athlete to safely and efficiently absorb shock through the joints
(hips, knees, and ankles) during the landing.
It also puts the body in the
right position to rebound safely and powerfully.
This movement comes fairly
easily once trained.
The goal is to land softly and transfer the impact forces,
first to the larger gluteus muscles, and then the hamstrings, quads, and calf
muscles during the landing.
Proper Landing
Technique:
Begin with a thorough
warm up, and use the glute activation routine to get the glutes firing prior to
practicing jumping and landing drills.
Initiate small (1-2
inch jumps), land as softly and quietly as possible, and sink deeply into the
landing.
Land with your whole
foot and keep your weight evenly distributed from heel to toes. Avoid landing
only on the balls of your feet.
Ensure your knees are
tracking over your foot and not caving in or falling outward.
Shift your weight back
over your heels. Your knees should remain behind your toes during the movement.
Focus on the glutes
(review the safe squat technique) throughout the movement.
Over several weeks, and
with your trainer's guidance, increase the height of your jumps to a 12-inch
box.
Follow your trainer's
lead regarding reps and sets, but consider performing 2-3 sets x 6-10 reps. Do
this 3 times each week or more as instructed.
Jumping drills can be
intense, so recover well after a session and stop when your form fails, your
lower body fatigues, or you have any aches or pains.
It does more harm than
good to practice this drills with poor or sloppy form.
This week we "stick" with the Standing
Long/Broad Jump.
We at Bulletproofbodies love this test of TRUE
HORIZONTAL POWER from point A to point B.
All that matters is how far you can jump.
Now that this has become an Army Fitness Test
it's time to get good at this.
However,
Can you stick the landing?
Do you need MORE absolute strength?
Do you need increased rate of force development?
Or
Is it your technique?
At Bulletproofbodies we recommend 3 dynamic
mobility exercises:
Mobilise inthe Lunge position to stretch Hip Flexors
The BootStrapper Squat with a light Kettlebell
McKenzie Press Up to stretch the abdominals
Your SECOND Jump will be YOUR BEST jump, so jack
your nervous system up first with an early first jump to prime your body for
the test.
Stance - feet hip width apart
Start with your arms above your head, then
forcefully Swing your arms down into shoulder extension, then drive them
forward as your torso extends and you reach "hang time."